Thursday, June 30, 2011

My Amazing New Seam Ripper


Look what my husband made me! It's a hand turned seam ripper. Boy do I feel special. It sure takes the sting out of needing to rip a seam let me tell you! It's a beautiful colored aqua acrylester. This seam ripper is substantially sized. It's about 4 3/4" long and 1/2" wide. It will be much harder to lose than my other tiny plastic one. Plus it's pretty and made with love so it makes me smile.

While he was at it, he made a few more! There is a red and white swirl, a multicolored swirl and a pink seam ripper too. They have a cap which you pull off, turn over, reinstert, and voila...


you have a seam ripper. The extras are in my shop. It won't break my heart if they don't sell because I could use more. I am constantly losing my seam rippers. I have suggested that he devise a seam ripper tracking system and he said he'd get right on it. I wouldn't put it past him either.

Wednesday, June 29, 2011

A Sunny Afternoon


(Wearing: Vintage dress, clutch and necklace, Vivienne Westwood tights and shoes)

It was randomly super hot on Sunday and I ended up in one of those I HAVE NOTHING TO WEAR tantrums, the ensuing closet massacre is still all over my bedroom. I decided to raid my shop instead, where I pulled out this dress. I had originally bought it for myself but got it home to be gutted the length was so short, I really only like knee length or longer dresses. Not that I have hideous knees or anything and I can get away with shorter lengths they just don't feel quite me. I have been looking out for some lace trim slips to solve this kind of problem, but remembered I had these crop tights which I tried it with, they seemed to work ok.

I'm still not sure if I should keep the dress or let it go to another home.
Any tips on solving the length issue?
Pearl

On Penguins and Earring Trees


There have been a lot of birthday parties lately and I made gifts for a couple of them. One of my son's best friends just turned 8 and recently got her ears pierced. Her mom suggested a need for something to hold her earrings. I sketched this design, inspired by Doohickey Designs by Riley Blake. My husband cut the wood and then I painted it. I hear that it was a hit.

I made this raw edge applique penguin pillow for my daughter's friend who just turned 6. He is very interested in the Arctic and penguins in particular, so much so that he attempted to lead his preschool class on an Arctic expedition right out of the playground this winter. Luckily, the teachers stopped them in time! This pillow provided an opportunity to try my first attempts at pebble quilting. I thought it would add a little texture to the ground. I would like to practice some more because I love the look of pebble quilting but it intimidates me.
Party gifts are always fun.

Power Dressing


Me aged around four wearing snow 'moon' boots and fly net 'veil' with my summer dress

This article brought back some fond memories:

Power dressing

You want her to wear the red dress to playgroup; she’s insisting on her mermaid costume. These days, the “you’re not leaving this house looking like that!” battles start young.

For many mothers of daughters, one of the best bits about having a little girl is the opportunity to dress her. Mothers of sons lament the lack of lovely clothing available to boys, and coo over the pretty womens dresses and adorable styles that reflect the sugar and spice that girls are, as tradition would have it, made of. And then there’s the question of colour, with girls clothing being available in everything from lolly pink to smart navy, while the hues of boys’ clothes tend to be a little more limited in range.

But there’s a flip side to the joy of dressing up your little dolly (and let’s face it, there’s almost certainly an element of this when it comes to clothing your female child) – and that’s when she starts exerting her independence and making her own choices about what to wear and how to wear it.

The perfectly conceived ensembles that you’ve bought for her get mixed and matched with other items; clothes from the dress-up box are worn, with staggering confidence, for a trip to the park or supermarket. Tutus and welly boots? Shorts over leggings? A sudden refusal to wear anything that isn’t pink; a sudden aversion to anything that isn’t at least a little bit princessy?

Sure, you can put your foot down. But should you? It’s worth remembering that her interest in clothes has probably come from you anyway, and that it’s important for children to feel and demonstrate a sense of autonomy. Letting your daughter express herself and her independence through her dress sense is one safe, healthy way that you can allow her to achieve this – far better in its visibility, surely, than more covert behaviour, which can’t necessarily be monitored.

As long as she is making choices that are appropriate for her own safety and wellbeing (ie – not provocative, and suited to the temperature) then the fact that she perhaps looks a little odd should probably be endearing rather than embarrassing or annoying.

One way to limit struggles over her clothes is simply to ensure that she doesn’t own any item of clothing that you don’t approve of in itself. That way, even if she wears it in a way that’s less than what you’d consider aesthetically pleasing, at least it’s not revealing / sparkly / emblazoned with a slogan – or whatever your personal dislikes happen to be.

By giving her licence to dress herself in her own combinations, you’re giving your daughter the chance to think for herself, build her self esteem and exercise her creativity. You may even be creating a budding fashionista to boot – and doesn’t every woman want a lifelong shopping buddy?

Tuesday, June 28, 2011

More Laminate!


I can't stop myself. I made one more Ruched Happy Bag. I used Queen Street laminate and cotton again. I love the pinks!


Once again, I used the laminate inside and for the focal band. This little bag, with it's water resistant properties, would be great for holding your cell phone and wallet pool side. Don't you think?


If you'd like to enter my giveaway for a free pdf Ruched Happy Bag pattern, check out the post below.

Cheap Tricks


(Wearing: Vintage skirt, Primark top and belt, Prada faux fur stole, Chanel shoes, Mulberry clutch)

I bought this vintage navy pleated skirt from eBay for about £1, however it was miles too big around the waist. Since I had paid so little for it I didn't then want to have to pay for it to be tailored so I got a bit creative.

Nail colour Mimosa by Chanel

I made two slits in the waist band and threaded a thin belt though, I then ruched the skirt along the belt so only the end and the buckle were visible. This allowed me to cinch in the waist.

I decided I liked the look of the tan belt with the skirt so I cut out two sections along each side to reveal more of the belt. I also chopped off a few inches from the hem, the fabric being strong enough to cope with a raw edge.

The belt on the sides

The belt from the front

The raw hem

I added a mani/pedi in bright yellow to contrast the pink and navy, shame it doesn't show up too well in the photo's. I love it when a plan comes together, believe me the amount of DIY roadkill I have created would make you weep.
Pearl

P.S Don't forget to join me on Facebook, I have been adding lots of photo albums and look books and even the odd fashion quiz - this weeks is regarding what you want to read about during fashion week - show reviews? who wore what? Nothing at all because it is boring?? You tell me!

Monday, June 27, 2011

Sewing with Laminates Mini Tutorial and a Giveaway!


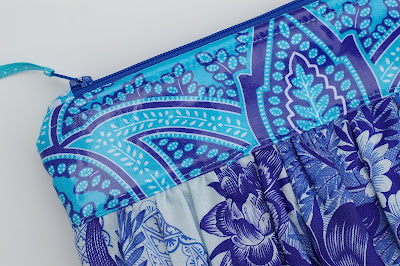
Have you ever sewn with laminates? I hadn't until yesterday. I had some beautiful Queen Street laminate and quilting cotton by Jennifer Paganelli and decided to try them out using my new "Ruched Happy Bag" pattern. The pattern is available in pdf form from my Etsy shop.


The bag is lined with laminate in case of cosmetic bottle spills.


I also used the laminate for the bag's focal band for a little bit of shine and interest.


The band was fussy cut to center the design. I love the look that gives. It's worth the little extra effort and tiny bit of fabric waste. I used quilting cotton for the back of the bag and for the ruched/gathered bottom. I am sure it would have been possible to use laminate but I like a softer feel to the gathers.

I learned a thing or two when attempting to sew with laminate for the first time and thought I would pass along these pointers!

Sewing With Laminates Mini Tutorial


First off, laminate punctured with pin holes loses it's water resistant properties! You can use fabric glues to hold your fabric in place when stitching but I didn't have any on hand. Instead, I pinned within the 1/4" seam allowance.


You can't iron laminates or they will melt. You can press with your fingernails but I also found that using a Hera marker as a bone folder worked well.


And finally, you need a Teflon presser foot to sew on laminates. Otherwise they stick and drag on your presser foot. I didn't have a Teflon foot so I settled for another solution that worked just fine for a small project like this. I placed tissue paper over my project and then stitched. I also lengthened my stitch length to 3.0 which looks nicer for top stitching and makes it easier when tearing away the tissue.


I was able to see clearly through the tissue and edge stitch quite nicely.


Simply tear off the paper and you are all set. This is where it gets a little annoying. Some tissue will stick on the stitches and you will have to pick it out with your fingernails. I'd buy a Teflon foot if I were sewing a raincoat but for this project, it is completely unnecessary. When sewing with laminate on both the top and bottom, I placed the tissue under the project AND on top.
I hope these hints were helpful.


To celebrate the release of my "Ruched Happy Bag" pattern, I'd like to offer a little giveaway. I will give away one copy of my pdf pattern on Saturday, July 2nd. You may enter by leaving a comment telling me what you like best in my shop. Leave a second comment if you are a follower.