
Have you ever sewn with laminates? I hadn't until yesterday. I had some beautiful Queen Street laminate and quilting cotton by Jennifer Paganelli and decided to try them out using my new "Ruched Happy Bag" pattern. The pattern is available in pdf form from my
Etsy shop.

The bag is lined with laminate in case of cosmetic bottle spills.
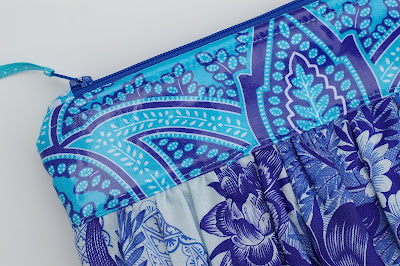
I also used the laminate for the bag's focal band for a little bit of shine and interest.

The band was fussy cut to center the design. I love the look that gives. It's worth the little extra effort and tiny bit of fabric waste. I used quilting cotton for the back of the bag and for the ruched/gathered bottom. I am sure it would have been possible to use laminate but I like a softer feel to the gathers.
I learned a thing or two when attempting to sew with laminate for the first time and thought I would pass along these pointers!
Sewing With Laminates Mini Tutorial
First off, laminate punctured with pin holes loses it's water resistant properties! You can use fabric glues to hold your fabric in place when stitching but I didn't have any on hand. Instead, I pinned within the 1/4" seam allowance.

You can't iron laminates or they will melt. You can press with your fingernails but I also found that using a Hera marker as a bone folder worked well.

And finally, you need a Teflon presser foot to sew on laminates. Otherwise they stick and drag on your presser foot. I didn't have a Teflon foot so I settled for another solution that worked just fine for a small project like this. I placed tissue paper over my project and then stitched. I also lengthened my stitch length to 3.0 which looks nicer for top stitching and makes it easier when tearing away the tissue.

I was able to see clearly through the tissue and edge stitch quite nicely.

Simply tear off the paper and you are all set. This is where it gets a little annoying. Some tissue will stick on the stitches and you will have to pick it out with your fingernails. I'd buy a Teflon foot if I were sewing a raincoat but for this project, it is completely unnecessary. When sewing with laminate on both the top and bottom, I placed the tissue under the project AND on top.
I hope these hints were helpful.

To celebrate the release of my "Ruched Happy Bag" pattern, I'd like to offer a little giveaway. I will give away one copy of my pdf pattern on Saturday, July 2nd. You may enter by leaving a comment telling me what you like best in my
shop. Leave a second comment if you are a follower.


