Tuesday, June 29, 2010

Make a Baby's Tutu-Sew

PLEASE DONATE. I recently had 2 surgeries, do not have health insurance and live on Social Security. I will be delighted to share with you if you will appreciate how much time and knowledge this takes. Thank you. Linda
Check out my other blog  http://teacupmilliner.blogspot.com/

Dress up your baby at Christmas or any time, with colors that you choose for the holiday.


You can also make them for larger sizes.  See instructions at the end of this blog.

Everyone loves to dress up a baby girl for picture taking around the holidays and a tutu makes little girls look like little angels.  I saw some soft emerald green netting when I went into Houston yesterday and fell in love with it.  It had sparkling glittering green dots all over it and that's what caught my eye.  It was 60% off so one yard came home with me and it kept on beckoning to me to make something.  This morning I decided to design and make a baby's tutu that would be a lovely attention getting during the holidays.

These instruction are to fit a large/extra large baby age 9-12 month.  However, you can lengthen the satin and skirt net for a toddler.  Once you understand how it is made, you can adjust accordingly.

How to make it.
Think soft when you choose the net and satin.  Remember it will go on a baby and it must be comfortable. 
You will need 1/2 yard of soft net 60" wide
3" by 36" of soft satin
42" of 1/8th to 1/4" ribbon.

Cut out 3" by 36" soft satin.

Pin and sew it into a circle.

I over locked both sides because satin frays when handling, but that is up to you.

Cut 2 pieces of soft net 16" by 60".

Make each net piece into a circle by joining seams and set one aside.  Run a row of gathers on one side of the other one and draw it up to fit the satin.  Right sides together, pin the gathered net to one side of the satin.  Sew them together, turn right side out and top stitch on the satin.  This will make the net lay nice and flat.

Do the same with the other net piece on the other side of the satin.

Right side out, fold the satin in half so that the skirt now has two layers.  Pin all around, then top stitch 1/2" from the top of the satin.  This is now the casing for the ribbon.

Lay the skirt with the circle joins at the back and to one side of the front, put 2 pins 1/2" apart.  Use a seam ripper and carefully make a small slit on the top part of the satin only.  DON'T GO THROUGH THE BOTTOM PART OF THE SATIN.  Use a dab of fray check on each slit to stop them from fraying.

Through one slot, use a safety pin and thread the 42" of ribbon all around to the other slot and come out.  Draw up and tie a bow.

Larger sizes.

I made this one to fit a toddler.  Follow the directions for the baby skirt.
1 5" piece of satin.
2 10" pieces of net.
46" length of ribbon.

For how to make the headress click here 

See how to make a fabric butterfly necklace, click here

For graphs, glues and stuff I use, check out this blog.


Sunday, June 27, 2010

Fabric Motif Jewelry-No Sew

PLEASE DONATE.  I recently had 2 surgeries, do not have health insurance and live on Social Security.  I will be delighted to share with you if you will appreciate how much time and knowledge this takes.  Thank you.  Linda   Check out my other blog

Make gorgeous jewelry to match the outfit you just made.
This oriental necklace was made out of left over fabric from a skirt I made and took very little time to make.  I added the oriental charm hanging from the bottom of the teapot.

The fabric had an assortment of Oriental teapots, cups and different teas dotted all over the background.  I picked out the blue set to make my necklace.

Last summer I started sewing again after years of caring for my husband before his death and then starting a new life.  I had forgotten what fun it was and busily made myself some fun cotton skirts to wear in our Texas summers.  When I finished one using a butterfly fabric, I went to wear it and couldn't find a piece of jewelry that worked with it.  The next day I hit upon an idea and gave it a try.  It's easy, fast and simple but makes the outfit complete.  I am often stopped while out shopping and told how lovely my outfits are and my necklaces are always noted.

Butterflies are always a source of beauty and pleasure.  I added a Fairy charm at the base and a couple of small rhinestone danglers each side.  I made it from the first fabric to the left.  (see below.)

Here are three samples of the type of butterfly fabric you should look for.  Butterflies should be separate from each other and not overlapping to get the maximum use of your fabric.  1/4  yard would be plenty if you only make jewelry.  I made a skirt and used the left over's to make my jewelry.

More butterfly fabrics where they are also totally separate from each other.

I bought these two pieces as remnants because I loved them, but they would not work out for jewelry because you would have so much loss.  Look closely and you will see that many overlap.

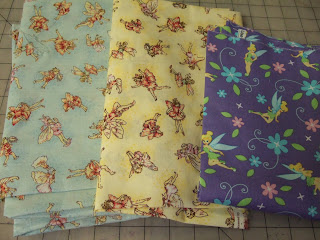
The first two fabrics I bought in England on a visit and they are small Flower fairies all over.  None overlap and they will be great for this technique.  The purple fabric I bought to make something and I can then use left over Tinkerbelle pieces to make jewelry.

These ducks and frogs would be great to make kids jewelry.

This Red Hat Lady necklace was made from the following fabric.  I added the handbag and shoe charms.

There were four different red hats on this fabric.

This lovely subtle rose fabric would also make a good necklace.

Now that you have an idea of how to choose fabrics, check out your 100% cotton scraps.  You are sure to have something on hand to test this out.

Now the technique.

Things you will need.
Patterned fabric.
A coordinating solid color fabric for backing.
Inexpensive white glue.
Chain o-rings and charms.

Step one.  Cut around a motif, leaving extra fabric.  Cut a piece of scrap backing fabric that will color coordinate with your motif.  Work on a surface that can be cleaned with water.  I use a plastic tray. 

Keep a wet cloth by your side when doing this technique.  Turn motif over and pour out some glue or use your finger to dip in a bowl of glue.  I prefer the latter.  Spread enough glue on the back side then place down on the backing fabric with front side up.

Now spread more glue on the top of the motif.

Place the wet motifs on a cake rack to dry out properly.  It is easier to do several motifs at once.

Here you can see the group after I cut around the motifs when dry.  Do not cut too close to the design.  If you are going to turn one into a necklace, leave enough fabric at the top to add an o-ring.

Now make some fun necklaces for your child's next birthday party.

My aim for this blog is to get women to create again.  You don't have to spend a lot of money to give a special gift.  The above necklace cost so little to make and took very little time.  I put an 0-ring in the top and bottom center of the motif.  I then made a chain necklace, see below.  I hung a bell in the lower o-ring because bells are very inexpensive and you can get a bag full for a small cost.  Charms cost more.  If you can't afford a lot, add a bell and tell the little girls the story about "every time a bell rings, a baby fairy is born."  They will love the story and the gift.

To make very inexpensive chains for your necklaces, buy a reel of crochet thread.  I had this silver thread in my craft stuff, but if you can't find it, use a color to coordinate with your motif.  Chain stitch 20" and tie ends.  Before you clip the extra thread, add a drop of fray check on the knot.  It will stop the knot from coming undone during play.

I had a bag of small silver charms with the word 'wish' in my craft supplies.  I had bought them on clearance awhile back and they are perfect for this theme.

For this piece I crocheted a gold cord and added a crown charm I already had.

Learn to make a tutu.
Learn to make a fairy crown.

I made a complete set of skirt, crown and necklace.

Be creative.  Don't spend tons of money.  Show your children how much fun you have making things for them.

For graphs, glues and stuff I use, check out this blog.


Wine Bottle Covers-Sew

PLEASE DONATE.  I recently had 2 surgeries, do not have health insurance and live on Social Security.  I will be delighted to share with you if you will appreciate how much time and knowledge this takes.  Thank you.  Linda 

Check out my other blog.  http://teacupmilliner.blogspot.com/
Take a great gift for the party host and make lovely covered for your bottle gift.
There are two styles for you to make, a drawstring cover where the bottle is completely covered and an open neck bag for the bottle to nestle in.

How to make the drawstring wine bottle cover.

Use an elegant brocade fabric to make this gift and your lady host will be sure to love it.

How to make the cover.

Most wine bottle bottoms are 3 to 3 1/4" inches across.  You will need something round that is 3 1/4" across and I used a ribbon reel.

Draw around the circle onto some tracing fabric and leave 5/8" all around for allowance.

When you lay a tape measure around the circle leaving 1/4" from the edge, it will measure 12"  Now you can work out your pattern piece.

I measured the height of the bottle and allowed leeway for seams and give.  When you sew in any circle, you must allow some give or the top piece will be too tight and not fit.  I have 12" plus allowance and came up with 13 1/4" wide.  I measured how tall the bottle was to decide how the cover would fit.  I made my pattern 14 1/2" tall.  I then added a casing 1 1/2" from top and drew a line.

For casing, lay bias tape under the 1 1/2" line and pin, then sew.

Measure 3/4" in both sides on top of casing area.  Make a small slit on the top of the fabric to thread ribbon through but don't go through the bias tape.  To stop fraying, add a dob of fray check over each slot.

In a contrast color cut a piece the same measurement as the top and 2" wide.  You can make a pattern piece from tracing fabric if you wish.

Pin right sides together and sew 1/4" in.

Sew side seam 1/4" in and Zigzag the raw edge.

Pin and sew circle onto bottom and Zigzag edges.

Turn down contrast top and pin, then move pins onto right side to sew.  This way you can see how straight you are sewing on top of contrast fabric.  Sew another line close to the edge to form a nice neat top stitch.

Thread 1/4" ribbon through the slots on the outside and add wine charms or beads on the ends.

Draw up and tie a bow.

You can also make this bottle cover in lace for a lovely see through gift.

How to make the open neck bottle cover.

Make your pattern the same width as the drawstring bag 13 1/4".  Make the height 10" tall.

This is the facing.  Make the pattern 13 1/4" by 7".

Some of the beautiful oriental fabrics are difficult to match , so I used the reverse of the same fabric for the open neck collar.  I have done this before when making garments and hats and you can see this on my other blog.

Fold your main piece in half lengthways wrong side out and stitch 1/4" in. 
Zigzag raw edge.

Iron on some heavy duty interfacing on the inside of the facing.  I am reversing this fabric for this piece so I ironed it on the right side.

Turn under 1/4" on one of the long edges and sew.

Fold facing piece in half with turned up edge downwards against the top of the main piece.  Place a pin to match where the stitching of the main piece began.  Stitch 1/4" in on this short area.

 
Cut out and sew bottom circle from drawstring bag on the bottom of the main piece and Zigzag around the raw edge.

Pin facing to main body piece right sides together, going down the sides as well as the top.
Sew 1/4" in and turn.

Neatly top stitch around all the facing and fold down as if it is a collar.

This fabric has great medallions in the print so I used iron on fusing with the same scrap fabric behind, then cut it out.  Fray check around the edge.

I sewed the medallion on the front so that it slightly overlapped the collar and added a PARTY charm at the bottom.

A few years ago I had fun decorating different shaped liquor, beer and soda bottles with clothes.  The following photos show you what I did.  Once you feel brave, have a go.

Fiesta time.  I used chili pepper cotton fabric for these.  Just add a hat.

Although I am not a drinker, I loved the shape of these Tequila bottles.

I also decorated shorter beer bottles.

Soda Jerks.  This was a fun theme and I made little hats.

It doesn't have to be liquor.  These were old fashioned root beer bottles.

I live in Texas so I decorated a Texas beer bottle with a cotton print of horses.

For a more formal look I added a top hat.

2 more formal looks.  Add a top hat and cane with tartan ribbon for bow tie and pocket handkerchief.

Dress up a bride and groom bottles for a wedding gift.

If you would like to purchase a copy of the vest pattern and instructions for $5, please email me at

For graphs, glues and stuff I use, check out this blog.